To enable encrypted connections to SQL Server, Microsoft have a document here. Step 8 of this article in the section “Computers that don’t have SQL Server 2019 Configuration Manager” refers to Importing a Certificate. Here I will show how to create one.
In the MS article, they link to another page that has Certificate Requirements and that states: The certificate must be in either the local computer certificate store or the SQL Server service account certificate store. We recommend local computer certificate store…
I also recommend the local certificate store too as it means you don’t have to log onto the server using the SQL Server service account or perform a runas on the MMC using the SQL Server service account – both of which could be prevented by your organisation’s security policy. Also, if you happen to change the start-up service account for SQL Server then it avoids having to provision a certificate again.
Step-by-step instructions, logged onto the server where the certificate will be installed. Obviously, you’ll need access to do this.
1. On the Start menu, select Run, and in the Open box, type MMC (and select OK). I’ve found that if you do this on a SQL Server or a server that has failover clustering installed, the start menu choices offered are usually either the Failover Cluster Manager or the SQL Server Configuration manager – neither of what you want. Therefore, browse to C:\Windows\System32\mmc.exe.
2. In the MMC console, on the File menu, select Add/Remove Snap-in….
3. In the Add or Remove Snap-ins dialog box, select Certificates in the LH pane and then select Add.
4. In the Certificates snap-in dialog box, select Computer account, and then select Next, choose Local computer and then Finish, then OK.
5. Step 6 and 7 in the MS article, it steps through the Import process. Follow this if you are importing a certificate that is provided to you or if you are importing a certificate on another node in the cluster. However, here, we want to create a certificate ourselves.
6. In the MMC console, expand Certificates (Local Computer) > Personal, right-click Certificates, point to All Tasks, and select Request New Certificate…
7. The Certificate Enrollment wizard starts, click Next > Next to get to the enrollment templates. This will vary by organisation or your lab setup but you’re wanting a Server Authentication or Computer template. I’ll provide general examples.
Click in the box of the template you intend to use and then on the small arrow beside the word Details to expand the properties of the template. Click on the Properties button to bring up the Certificate properties that you will fill in. The correct format for filling in a certificate I will show here but this is also highlighted in another MS article about connecting to an Availability Group Listener in the section Listeners & TLS/SSL certificates here.
On the General tab, enter the Friendly name of the cert, usually the NETBIOS name of the server and a basic description.
On the Subject tab, in the Subject name section, click on the drop down and choose Common name. Here you only enter the FQDN of the computer i.e. server1.sqldba.nz
In the Alternative name section, choose DNS and enter the NETBIOS name, the FQDN and if it is an AG node, the Listener name too, in both short-form and FQDN. i.e.
- server1
- server1.sqldba.nz
- server1_listener
- server1_listener.sqldba.nz
This is all detailed in the link above about Listeners and TLS/SSL certificates. It will look something like this on my ClusterA instance:

The other tabs do not require any information except the Private Key tab – which you can fill out now or after the certificate is provisioned. To do this step now, expand the Key permissions field and click in the Use custom permission box to be able to use the Set Permissions… button. The Permission for Private key box opens and use this to add permissions as normal except in this case, click Add… and then use the Locations… button to change to the local server. Type in the object name box “nt service\mssqlserver” (excl quotes) for a default instance or “nt service\mssql$<instance_name>” for a named instance. When you hit the Check Names button, if it is correct, the account will change to MSSQLSERVER in uppercase with an underline. In the permissions for MSSQLSERVER, it only requires Read permission. This assigns the SID for the service account read access to the certificate.
If you choose to do this step afterwards, or you want to check the permission on the certificates private keys, right click on the certificate and choose All Tasks > Manage Private Keys… Here you will see the read permission on the private key or you can add it now, following the step above.
The certificate is now added to the server and the SQL Server has read access to it. To tell SQL Server to use the certificate, open SQL Server Configuration Manager and expand the SQL Server Network Configuration. Right click on Protocols for MSSQLSERVER choosing Properties and you will see the Certificate tab. Click on the drop down and you should see your certificate. Once you select it, you will see all the fields appropriately fill in.
If this is a cluster node, the cluster virtual computer account name isn’t the same as the server name so you will need to add the certificate to SQL Server startup manually via the registry.
Double-click on the certificate and on the detail tab, scroll down to the Thumbprint field. Copy the thumbprint, being careful to not get any additional spaces or characters in it. Open registry editor and go to this key (this is on my SQL 2019 SQL Server):
HKEY_LOCAL_MACHINE\SOFTWARE\Microsoft\Microsoft SQL Server\MSSQL15.MSSQLSERVER\MSSQLServer\SuperSocketNetLib
There is a key called Certificate there, paste the Thumbprint value in here.
You will need to cycle the SQL Server service to pickup the certificate and when it is running again, check the errorlog and look for a line that matches the thumbprint in the errorlog:
The certificate [Cert Hash(sha1) “6A69B835EE454A364FD89854EED62B9F0C09DE85”] was successfully loaded for encryption.
Now you can test your certificate.
Open an SSMS connection to your SQL Server and on the Connection Properties tab, click the Encrypt connection box like so:
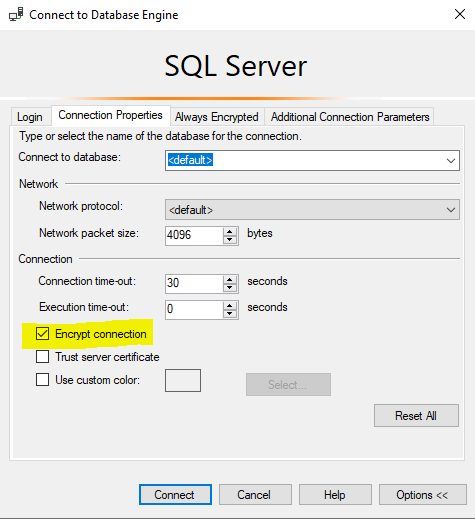
Now you can query your own connection to see if it is encrypted:
SELECT * FROM sys.dm_exec_connections AS c
WHERE c.session_id=@@SPID
Check that the “encrypt_option colum shows “TRUE”